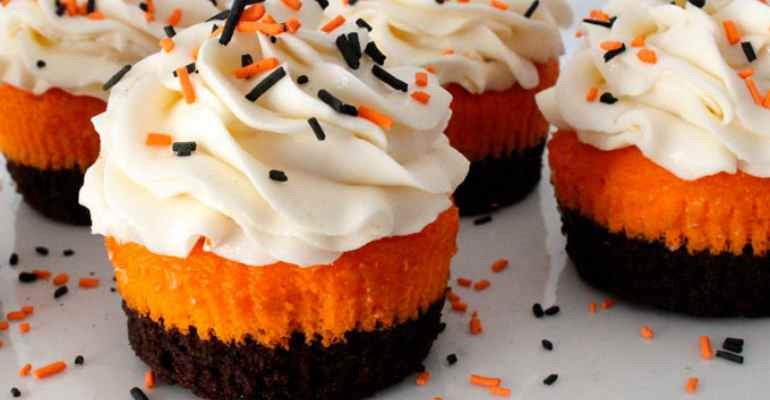
To get the bright orange color shown, use a food coloring that is already orange. Trying to mix red and yellow food colorings together, into a white cake mix, will result in a peach color, instead of that bright, beautiful pumpkin-orange color you want.
Worried that the two different batters are going to mingle? Don’t be! The batters are of different viscosities and compositions, so they will not mix unless you deliberately mix them.
Tips for getting the cupcakes out of their liners, intact. First, spray the liners with cooking spray. Let cupcakes cool completely before removing the liners, keeping the liners on until right before you serve, so they don’t dry out. To remove, pull down liner sides, leaving the bottom on. Gently roll the liner off the bottom.
INGREDIENTS
Brownie Mix
White Cake mix
Cupcake Liners
Buttercream Frosting
Halloween sprinkles
Pastry Frosting Piping Bag and Wilton 2D Decorating Tip (See Quick Tip)
INSTRUCTIONS
Preheat oven to 350 degrees F.
First mix up a batch of brownies. We used Ghirardelli Chocolate Supreme Brownie Mix.
Second, mix up a box of White Cake Mix and color it with orange food coloring.
Add a spoonful of brownie mix to the cupcake liners. The brownie batter should only go about 1/3 of the way up the cupcake liner. You want more cake batter than brownie batter.
Then cover the brownie batter with the orange cake batter. Bake the cupcakes as you normally would, 15-20 minutes.
Swirl on buttercream frosting. (A recipe for buttercream frosting is linked on Two Sisters Crafting website)
Top with some orange and black sprinkles. (A recipe for these sprinkles is linked on Two Sisters Crafting website)
USE RED NEXT PAGE LINK BELOW
NEXT
Quick Tip: Don’t have a pastry frosting piping bag and decorating tip? You can improvise by putting your frosting in a sturdy plastic bag. Twist the top closed to apply pressure to the frosting. Cut a small opening in one corner of the bag and squeeze to force the frosting out. Start by going around the outer edge of your cupcake and moving inward and upward as you slightly overlap the layers you make, building toward a pointy top.
Recipe and image courtesy of Laurie and Nancy at Two Sisters Crafting
Leave A Comment